When creating the necron destroyers I was very eager to get smoke coming out of the exhausts, I did some searching on u tube and read about particle flow systems.
Particle flow systems are precreated systems that dissipate particles in various forms and settings you can have particles shot out of a hose or moving within a box or faling down to the grond like rain and snow.
These systems generate and move a large number of very small objects which rendered under the right setting can be made to look like smoke,water,snow, toxic fumes and etc.
As I mentioned they come predesigned and with many good presets. For my need of toxic fumes I found that the bubles preset worked better than the smoke setting. You have great control over these paricle flow systems, you can set the speed,distance,volume,angle, size and duration that the particles travel. you can also set the start and end time within the scene. I found that the most important part of particle systems is to create a good material for its use, if you dont it will look like a bad computer effect.
Once I got the affect desired I cloned it for the other exhausts.
But I wanted more, I wanted the smoke to shoot out of the exhaust ant then drop due to gravity before it desolves.
For this I used a gravity space warp. A gravity space wark is created like a camera, so it is wise to make the gravity space warp in top view so that it points towards the bottom.
One gravity space warp can be linked to many particle flow systems, or we can have multiple gravity space to set diffrent directions.
I also think if you have 2 objects and change their physics the heavier in matter object will fall faster, but I have not looked in to that yet.
I selected the space warp link and draged from the particle system to the gravity pointer.
Now when I played the animation the particles were moving too fast down. So I selected the gravity space warp then editor and reduced its strength to get my desired effect.
Conclusion
Effects such as fumes, snow, smoke or water can be achieved with the particle flow generators. They have many usefull presets and many settings and they can also be changed in the timeline animation. Other ways for achieving these effects would be after effects but thats seems more tiresome. Finaly a 3rd party plug in for 3ds max; fumes fx is a very popular and effective tool that seems to give you even more control over the shape of the smoke or fire.
The gravity space warp will be usefull in my project for the fumes and in the future when animating motion of chains items droping like the screws from the dreadnought.
Friday, 28 October 2011

Working with materials.
In this post I will discuss how I made my textures.
The first texture was the Glowing green light that is used on the necrons.
I had a good look for glowing effects on you tube.
The following link shows 3 methods to achieve the glowing effect.
http://www.youtube.com/watch?v=4QAHIYCYB3o&feature=related
I chose the last one used in the video.
In the material editor I select a new material and set it to architectural and add the limnosity. and select my green colour.This makes the object illuminate light. To create the glow effect (making the black around my area go greenish) I clicked on render set up and on the output lence I added the glare. and draged it to the material editor.
The glare was too much so I reduced it.


I also created the crome from watching this video: http://www.youtube.com/watch?v=0ULDU2ULS1g
I select an empty material and set glossiness to 40 and set diffuse colour to dark grey.
The Raytrace is set to 80 and then selected and Raytrace is chosen.
Also when looking for tutorials to create chains to use in my enviroment i stumbled across this tutorial which showed me a smart way making my metal to look rough with the use of selecting a bump map and applying dent to it. I have not used it yet but i intend to on my enviroment and maybe on my dreadnought.

Finaly the most complex material i made was for the smoke coming out of the exhaust's.
I took guide from this video (http://www.youtube.com/watch?v=K3regJHtfBU&feature=related)
again starting from standard the glossiness is set to 0 which makes sence, and then for the oppasity a gradient is used.
I set colour #1 as black and colour #2 a very dark grey, colour #3 is set to a smoke modifier.
Conclusion
The material editor is a very powerful tool. Materials can be given great complexity as you can apply diffrent materials inside your material. For the smoke for example a gradiant was used for is diffuse colour and that gradiant in turn had a smoke effect within it.
The rusty chain had inside it a bump map that used the dent material.
I have understood the basics and how it works but I am still unaware of all it abilities and potential, something that will only come with practice.
The first texture was the Glowing green light that is used on the necrons.
I had a good look for glowing effects on you tube.
The following link shows 3 methods to achieve the glowing effect.
http://www.youtube.com/watch?v=4QAHIYCYB3o&feature=related
I chose the last one used in the video.
In the material editor I select a new material and set it to architectural and add the limnosity. and select my green colour.This makes the object illuminate light. To create the glow effect (making the black around my area go greenish) I clicked on render set up and on the output lence I added the glare. and draged it to the material editor.
The glare was too much so I reduced it.


I also created the crome from watching this video: http://www.youtube.com/watch?v=0ULDU2ULS1g
I select an empty material and set glossiness to 40 and set diffuse colour to dark grey.
The Raytrace is set to 80 and then selected and Raytrace is chosen.
Also when looking for tutorials to create chains to use in my enviroment i stumbled across this tutorial which showed me a smart way making my metal to look rough with the use of selecting a bump map and applying dent to it. I have not used it yet but i intend to on my enviroment and maybe on my dreadnought.

Finaly the most complex material i made was for the smoke coming out of the exhaust's.
I took guide from this video (http://www.youtube.com/watch?v=K3regJHtfBU&feature=related)
again starting from standard the glossiness is set to 0 which makes sence, and then for the oppasity a gradient is used.
I set colour #1 as black and colour #2 a very dark grey, colour #3 is set to a smoke modifier.
Conclusion
The material editor is a very powerful tool. Materials can be given great complexity as you can apply diffrent materials inside your material. For the smoke for example a gradiant was used for is diffuse colour and that gradiant in turn had a smoke effect within it.
The rusty chain had inside it a bump map that used the dent material.
I have understood the basics and how it works but I am still unaware of all it abilities and potential, something that will only come with practice.
Thursday, 27 October 2011
Story board up to date.
Before I hand in the first part of the assignement I recreated the story board using my models to get a feeling of the camera view. I choose the view to be coloured pencil cause most storyboard start out as pensil scetches.


Wednesday, 26 October 2011
Layers In 3ds max.
During practical 3 Steve showed us the use of layers.
The three weeks before that even with my non complex shapes I had made great use of freeze and hide.
the selecting the parts to freeze or to hide could some times be tidius and i also found groups not very help full because you need to break the group down to edit a component and then there is no way of automaticly regrouping if I am not mistaken. Then came layers.
Layers are a very usefull tool helping you keep your workspace neet and tidy and speeding up you projects and giving you clear managment of you components.
Here is a picture of my Necron destroyer and the Layers. Maybe in the animation prosess I will decide I need to break them down into more layers that is also easy.

Now I can freeze and hide in logical groups.
I create a Layer for the body, the torso, each hand, head and staff.
I also created layers for:
A few things to have in mind with layers.
The three weeks before that even with my non complex shapes I had made great use of freeze and hide.
the selecting the parts to freeze or to hide could some times be tidius and i also found groups not very help full because you need to break the group down to edit a component and then there is no way of automaticly regrouping if I am not mistaken. Then came layers.
Layers are a very usefull tool helping you keep your workspace neet and tidy and speeding up you projects and giving you clear managment of you components.
Here is a picture of my Necron destroyer and the Layers. Maybe in the animation prosess I will decide I need to break them down into more layers that is also easy.

Now I can freeze and hide in logical groups.
I create a Layer for the body, the torso, each hand, head and staff.
I also created layers for:
- The Light and Floor (for display and rendering purposes only)
- My gravity controler.
- My Rotation Camera and Camera path.
- My smoke partcle system.
A few things to have in mind with layers.
- When you create a new object 3d max add the object to the active layer (marked with a tick).
- You can easily move it to another layer if you change your mind by selecting the objects you want to move, select the layer you want them to move into as active and then press the "+" symbol on the layer managment window.
- You can select to hide a object with in a layer individualy, if you do remember to turn it visible again before you move or scale the components in the layer because the object will be unafected if you don't.
- If you are creating shapes that dont show up on screen check your active layer is not set to hide.
Creating the Necron Head.
Probably the hardest part in any humanoid model is the head. Many points and curves and the major focus point on a model. Initialy I thought of making a spline shape of the head and then use bevel profile on it.
I was not happy with the outcome.

My next step was to do some research on u tube, how do profesionals make their character heads?
I found 3 methods.
The first is to create a plane and upload a front and side image of your head then using planes to create the areas around the mouth and eyes and the attach and weld the planes and expand.


And the third method was using A program like z brush and virtualy sculpt the head.
So I tryed the second approch; I created a sphere resized it and the converted to an editable poly.
After that there was alot of vertex adjusting as you can see in the pictures bellow.


 At one point onwards I started to work on only one side.
 When i was happy with the result I removed the unworked half then cloned/ mirror/attach /weld
 Then I used boolean for the mouth slot and "teeth"
 For the nose I drew a spline then shell, rotate and allign it to the middle.

 Not happy with the cheeks, I edited them a bit more.
WEhen the model was ready added the shell modifier.
 When I placed the eyes it felt very hollow.
So I cloned the head, kept the section around the eyes and smade it smaller and moved a bit back, this created depth to the eye socket.

 Appling the crome effect and glow material to the eyes.


This was probably the most chalenging part of tyhe model. In the future I will attempt to create a head with the use of planes.

I was not happy with the outcome.

My next step was to do some research on u tube, how do profesionals make their character heads?
I found 3 methods.
The first is to create a plane and upload a front and side image of your head then using planes to create the areas around the mouth and eyes and the attach and weld the planes and expand.


You Can see the complete video at http://www.youtube.com/watch?v=pD6AlOPzSro
The second method is by creating a box and split polygons and move vertexes.
(The link of the video I had does not work now)
And the third method was using A program like z brush and virtualy sculpt the head.
So I tryed the second approch; I created a sphere resized it and the converted to an editable poly.
After that there was alot of vertex adjusting as you can see in the pictures bellow.


WEhen the model was ready added the shell modifier.

So I cloned the head, kept the section around the eyes and smade it smaller and moved a bit back, this created depth to the eye socket.


This was probably the most chalenging part of tyhe model. In the future I will attempt to create a head with the use of planes.
3 Models finished.
After 6 weeks of learng and work, my 3 models are complete.
My 3 models are:
The Dreadnaught

The Necron Lord

The Necron Destroyer

The last two have their two textures applied. Crome and glowing green. The Dreadnaught still needs some textures,
It will be my next step after I catch up with my write ups. Model-wise I still need to build the enviroment.
My 3 models are:
The Dreadnaught

The Necron Lord
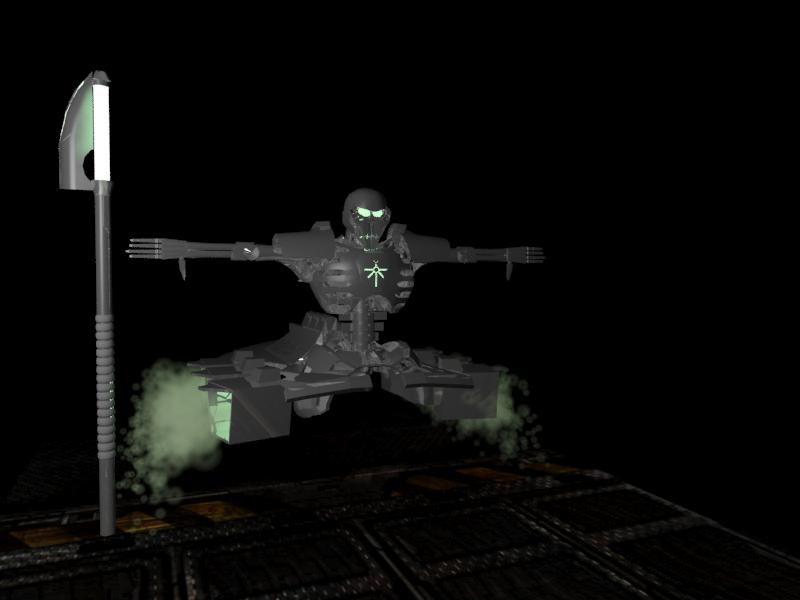
The Necron Destroyer

The last two have their two textures applied. Crome and glowing green. The Dreadnaught still needs some textures,
It will be my next step after I catch up with my write ups. Model-wise I still need to build the enviroment.
Friday, 14 October 2011
The necrons will Rise
The model is almost finish, but i could not resist and started playing with materials, so tempting.

Subscribe to:
Posts (Atom)